“I open FCP 7 to edit Sony M2TS files. I though this could be possible as the FCP 7 web site indicates Native editing support for AVCHD. But disappointedly this is not the case. I assume not only me but others made same mistake. I am not hoping reimbursement, but hoping native support of m2ts. I'd like to Apple technicians if I can expect this in the near future.” Why can’t Log and Transfer Single Sony M2TS files to Final Cut Pro 7Final Cut Pro 7 (and any previous version) does not have native editing support for Sony M2TS footage. When working with Sony M2TS recordings in Final Cut Pro 7, the first thing you need to do is ingesting Sony M2TS in the Log and Transfer window, where you can transcode Sony M2TS to an Apple ProRes codec or the Apple Intermediate Codec, both are natively supported by Final Cut Pro 7. Furthermore, keep in mind that we can't import Sony M2TS files directly from the Finder. If you navigate to them from the Import dialog, it will have them grayed out. FCP 7 doesn't work with them directly, you must import Sony M2TS files directly from the camera, from a memory card (with the original file structure in place), or from a camera archive. But having to use camera archives is too much trouble.M2TS is a compressed output format, but not ideal for editing in NLE system. So Final Cut Pro 7 does not like the way in .M2TS. Then M2TS is not supported natively by Final Cut Pro 7, what should you do?Converting Sony M2TS to Apple ProRes 422 MOV for Final Cut ProWe just need a way with no require with ingest supported with additional software and no use camera archives method. To achieve the goal, Pavtube MTS/M2TS Converter for Mac (Best MTS/M2TS Converter for Mac Review) is recommended for you, with this you can achieve the Sony M2TS to Final Cut Pro 7 conversion. It's designed directly to convert M2TS (1080p60/50 included) to FCP 7 natively supported Apple ProRes. So no matter the M2TS files are single .M2TS files or directly from your camera, you can transfer it to FCP 7 compatible formats and directly import it to FCP 7 for easy editing. Plus, this program also supports converting AVCHD M2TS footage to iMovie, Adobe Premiere, Avid Media Composer, Final Cut Express and more to meet your needs. What's more, some easy-to-use editing features like trimming, cropping, adding watermark, deinterlacing, etc are combined with the convert program.If you are running on Windows, please get Pavtube MTS/M2TS Converter.The trail-before-purchase is supported, just feel free to try it:
 Key Features:
- Three simple clicks to convert Sony M2TS videos to Final Cut Pro 7 compatible formats.
- Aside from Final Cut Pro 7, you can directly convert M2TS to iMovie, QuickTime, Windows Movie Maker and more video editors supported formats without additional settings.
- Edit your Sony M2TS videos before converting them. With the built-in editor, you can trim or crop your videos. And you are able to add subtitles and watermarks to the videos as well.
- Perfectly compatible with Mac OS X 10.11 El Capitan, 10.10 Yosemite, 10.9 Mavericks, 10.8 Mountain Lion, 10.7 Lion and 10.6 Snow Leopard.
Notes: 1.When converting video to Final Cut Pro oriented format templates(e.g. Apple Prores), please ensure that your computer has Final Cut Pro 7 installed, otherwise the converted files will have audio only without image.2.If you are using FCP X, please make sure you have installed ProApps QuickTime Codecs, or you may get files with sound only without video.Install and run it, you will see the interface. The following is a simple instruction of how to use this Pavtube Mac MTS/M2TS Converter:How to Convert and Import Sony M2TS Files to Final Cut Pro 7Step 1. Click the “Add File” button to select the Sony M2TS videos from your hard drive to this program. To save your time, this program supports batch conversion so you can add multiple files at a time.  Tips: When the M2TS files are loaded to the Pavtube MTS/M2TS Converter, you can view the videos from the Preview window. Simply select an item and click the “Play” button. When the video is playing, you are allowed to take snapshoot.Step 2. Choose output format, to edit videos on Final Cut Pro 7 native codec, you are recommended to choose Final Cut Pro -> Apple ProRes 422 (*.mov), it’s best for Final Cut Pro X editing.
  Read the difference of ProRes. • Apple ProRes 422 – Higher quality than Apple ProRes 422 (LT); • Apple ProRes 422 (HQ) – Keep original video quality for editing in FCP; • Apple ProRes 422 (LT) – Get a smaller file sizes than Apple ProRes 422; • Apple ProRes 422 (Proxy) – SD levels – 480i/p and 576i/p. Used in offline workflows. • Apple ProRes 4444 – Edit and finish 4:4:4 material. Actually, different Apple ProRes codec corresponds to different needs. Here you can refer to this article "Differences among Apple ProRes codec". Step 3. You can click “settings” to adjust the output parameters, like resolution, bitrate, etc. Don't forget the balance between video quality and size.
  Step 4. Click the “Convert” button to start converting Sony M2TS to Apple ProRes 422. After that, click the “Open” button to locate the output files and transfer the files to FCP 7 as usual. Launch Final Cut Pro 7, choose File >> Import >> Files..., and browse to where you save the converted Sony M2TS clips to. Choose the videos that you'd like to add.Read More:
DaVinci Resolve can handle much more native video formats and camera files than any other real time editing system. However, it cannot handle the MTS footage from Sony, Panasonic or Canon cameras. That's why you found it's a painful experience to import MTS files to DaVinci Resolve 9/10/11/12 for editing.  On many HD video editing forums, there are many users complained about the issue to import MTS to DaVinci Resolve for editing, the DaVinci Resolve video editing software can’t support MTS video files recorded by Sony, Canon, JVC, Panasonic, etc. so users can’t load the MTS footages to DaVinci Resolve for editing smoothly. How to solve this MTS to DaVinci Resolve importing and editing issue easily?Read through some posts online, I have found some similar (but not identical) problems like no audio, import slowly… After looking into this more, I know that DaVinci Resolve has not offered support for MTS video.To make MTS files compatible with DaVinci Resolve, the easy and reliable workaround is to transcode MTS to DaVinci Resolve 9/10/11/12 supported video formats such as QuickTime, ProRes, DNxHD first.To convert MTS to DaVinci Resolve 9/10/11/12 easily and quickly, Pavtube MTS/M2TS Converter for Mac (Best MTS/M2TS Converter for Mac Review) is highly recommended. This program features high efficiency and seamless conversion. With it, you can transcode MTS to DaVinci Resolve 9/10/11/12 compatible video(QuickTime, ProRes, Avid DNxHD is well supported by this powerful editing system) with original quality. Besides, this software can also transcode MTS files for editing in Final Cut Pro 7/X, iMovie, Final Cut Express, etc NLEs. If you are running on Windows, please get Pavtube MTS/M2TS Converter.The trail-before-purchase is supported, just feel free to try it: Key Features:
- Three simple clicks to convert MTS videos to DaVinci Resolve 9/10/11/12 compatible formats.
- Aside from DaVinci Resolve, you can directly convert MTS to iMovie, QuickTime, Windows Movie Maker and more video editors supported formats without additional settings.
- Edit your MTS videos before converting them. With the built-in editor, you can trim or crop your videos. And you are able to add subtitles and watermarks to the videos as well.
- Perfectly compatible with Mac OS X 10.11 El Capitan, 10.10 Yosemite, 10.9 Mavericks, 10.8 Mountain Lion, 10.7 Lion and 10.6 Snow Leopard.
Install and run it, you will see the interface. The following is a simple instruction of how to use this Pavtube Mac MTS/M2TS Converter:How to Convert and Import MTS Files to DaVinci Resolve 9/10/11/12Step 1. Add MTS filesClick "Add Video" button to load .mts files to the program. You can also directly drag the video files into the program directly.Step 2. Select output formatAs is mentioned above, Avid DNxHD is well supported by DaVinci Resolve 9/10/11/12. So just click the format bar to follow “Avid Media Compose” > “Avid DNxHD 720p (*.mov)” or “Avid DNxHD 1080p (*.mov).”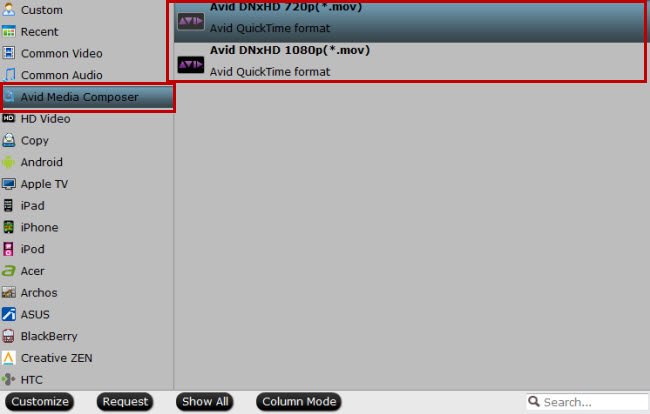 Tip: If you like, adjust video and audio parameters, including the Bitrate of Video and Audio, the Codec of Video and Audio, Video Size, Sample Rate, Frame Rate, Audio Channels, etc., by clicking the Settings button on the main interface for getting the best quality.
 Step 3. Start the conversionFinally, simply hig the big Convert button to start converting MTS to DaVinci Resolve 9/10/11/12 friendly video formats. Within several minutes, you can find the converted file on your computer by clicking the "Open" button. And then you can import the converted files to DaVinci Resolve 9/10/11/12 easily.Read More:
When it comes to a video format, MP4 may first come into your mind since this MPEG-4 Part 14 file format enables you to limitlessly access to almost all media players. However, even though such multimedia container is near-perfect, there still has something to improve.QuickTime is an extensible multimedia framework powered by Apple Inc., which has the feature of handling various formats of digital video, picture, sound, panoramic images, and interactivity. Since QuickTime is compatible with both Windows (Windows XP and later) and Mac (Mac OS X Leopard and later) and very powerful, it is quite popular. Although MP4's file structure is based on Apple’s QuickTime technology, its data embedded in this MPEG-4 Part 14 file, like MPEG-4 Part 10 (known as H.264/MPEG-4 AVC), MPEG-4 Part 2, etc, causes a codec problem which doesn't work well with Apple products. As a result, if you'd like to play MP4 on QuickTime, you’d better convert MP4 to MOV on Mac first because the MOV container is the default format of Mac OS X and performs optimum compatibility with QuickTime.To solve QuickTime won't play MP4 issue, a strongly recommended solution is to convert all kinds of MP4 videos and movies to QuickTime more compatible MOV formats.How to Convert Various Kinds of MP4 Files to QuickTime Formats?Works as a professional Video Converter, Pavtube Video Converter / Mac Version is your best choice, which can convert different kinds of MP4 videos and movies to QuickTime supported MOV, MP4 formats for playback, no matter the MP4 files are encoded with which kind of audio and video codecs. Besides, Pavtube Video Converter supports converting more than +160 video and audio formats. How powerful it is!Pavtube Video Converter is also an all-in-one video converter, editor and player, with which, you can convert files among hundreds of formats, optimize your video and movie as your liking and play almost all kinds of video and audio files freely. It is really get sth done once and forever.
 Other Download:- Pavtube old official address: http://www.pavtube.com/video_converter/- Amazon Download: http://download.cnet.com/Pavtube-Video-Converter/3000-2194_4-75734821.html- Cnet Download: http://download.cnet.com/Pavtube-Video-Converter/3000-2194_4-75734821.htmlSteps on How to Convert MP4 to QuickTime Supported FormatsFree download and install this powerful Pavtube Video Converter, and then follow the step by step guide to finish MP4 to QuickTime transformation.Step 1 Load MP4 to Pavtube Video ConverterSimply drag and drop MP4 files to MP4 to QuickTime Converter. To batch convert a couple of MP4 files, put them in one folder and then drag this MP4 folder to MP4 to QuickTime Converter, you'll see the files are loading in the task list in order quickly.
 Step 2 Set QuickTime compatible formatsClick "Profile" drop-down button to choose "MOV QuickTime Video (*.mov)" as output video format from the "General Video" category.
 Step 3 Convert MP4 to QuickTimeClick the big "Convert" button to start converting MP4 to QuickTime with fast conversion speed.Related program:Pavtube HD Video Converter / Mac Version: It is designed for converting HD videos from HD camcorders or DVs (like JVC, Panasonic, Sony and Cannon), non-protected HD or movies, DVR files (*.tivo) to other file types for playback on popular media devices like Apple TV, PS3, Xobx, Xobx360, WD TV HD Player.Read More:
VLC is an open source multimedia player that works on various platforms. It can play various multimedia files in addition to audio, VCDs, DVDs, CDs and different streaming protocols. VLC can work on Windows, Mac OS X, iOS, Ubuntu and Android. It is also free of ads and does not track the user's activities and information. Why VLC Cannot Play MP4?VLC will not play certain mp4 h264 files. Some h264 files work, others don't. I don't know why. VLC does play MP4 files, but it has strict limitations: VLC Media Player is only compatible with MPEG-4 ASP, DivX 4/5/6, XviD, 3ivX D4 and H.264 / MPEG-4 AVC. However, MP4 is a multimedia container format with many kinds of video and audio codecs. If your MP4 file contains a VLC unsupported audio or video codec, VLC won't play it. In this case, we'd better to convert MP4 to VLC more popular video formats. The following article will introduce an ideal MP4 to VLC Converter and a step by step guide on how to successfully solve "VLC not playing MP4" issue with ease.How to Solve "VLC Not Playing MP4" Issue?Pavtube Video Converter / Mac Version is specially designed for solving the VLC MP4 issue like "Does VLC play MP4? Can VLC play MP4? VLC not playing MP4? VLC won't play MP4? How to smoothly play MP4 in VLC?" etc. With this powerful MP4 to VLC Converter, it becomes easier to play all kinds of MP4 in VLC Media Player and you will never encounter the above problems.What's more, Pavtube Video Converter also supports converting other VLC incompatible video or audio files like MOV, MKV, WTV, FLV, ASF, MXF, WebM, OGV, 3GP, OPUS, VOC, AIFF, QCP, MPC etc to VLC Media Player supported formats for playback.Better still, Pavtube Video Converter works as a professional video editor as well. Before play the converted MP4 files in VLC, you can optimize the MP4 files like: combine them into a big one, split them, cut or crop them as your desire, change the audio channel, adjust the audio volume/bitrate/sample rate, add effect/watermark, etc.How to Solve "VLC Not Playing MP4" Issue?Free download and install Pavtube Video Converter firstly, and then launch it. Simply follow the step by step guide to solve "VLC won't play MP4" issue.Step 1 Add MP4 file to the programJust drag and drop MP4 to the main interface of Pavtube Video Converter and the file will be loaded instantly.Step 2 Set output formatClick "Profile" drop-down button to choose output format from "Common Video" category. If your source file is HD, please select output format from "HD Video" category.
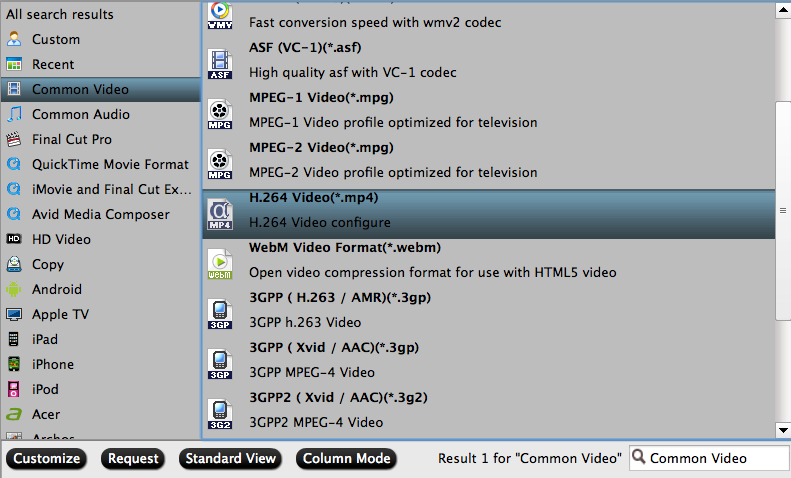 Step 3 Convert MP4 to VLCClick the "Convert" button to start and finish converting MP4 to VLC more supported format to play MP4 in VLC with no trouble.Related program:Pavtube HD Video Converter / Mac Version: It is designed for converting HD videos from HD camcorders or DVs (like JVC, Panasonic, Sony and Cannon), non-protected HD or movies, DVR files (*.tivo) to other file types for playback on popular media devices like Apple TV, PS3, Xobx, Xobx360, WD TV HD Player.Read More:
There are already a number of apps out there both for the 3D VR Glasses/Headsets such as Oculus Rift and for Google Cardboard-style devices which can play a movie in a "virtual theater."Basically, it puts you into a seat in front of a giant movie screen. This is particularly useful if you want to watch a movie on your cell phone. Next, if you have a movie that's been filmed in 360 degrees, the YouTube app for Android will automatically convert it into immersive, side-by-side virtual reality view. (iPhone support is reportedly coming... eventually).If you have a movie that's been filmed in regular old 3D, you can also watch it with a headset, but it won't be immersive -- you won't feel as though you're in the middle of it. At best, you'll feel as though you're sitting in a theater wearing 3D glasses, watching a 3D movie.There are tools to emulate 3D perspective from 2D movies, but have very low expectations. It gets very uncomfortable and most of the times it gets the depth incorrectly. A 2D movie simply doesn't have enough information to have a software guess what's the right depth and since you don't know what's behind an object, even when it guesses the depth correctly, it won't look natural.Play any video files on Oculus Rift with 3D effectTo watch any incompatible file formats such as AVCHD, MXF, Tivo, etc video files on Oculus Rift in 3D effect, you will need to convert these file formats to 3D SBS. Pavtube Video Converter / Mac Version, a comprehensive tool that's capable of converting various media files to 3D SBS format to watch on Oculus Rift and also other Virtual Reality devices including Samsung Gear VR, Zeiss VR One, etc.Free download the Trail version and have a try, it is 100% clean and safe: Step by step to convert any video to Oculus Rift 3D formatsDownload and install Pavtube Video Converter on your computer or Mac (compatible with Windows 10, 8.1, 8, 7 and lower versions / Mac OS X 10.11 El Capitan, 10.10 Yosemite, 10.9 Mavericks, 10.8 Mountain Lion, 10.7 Lion, 10.6 Snow Leopard, 10.5 Leopard and lower versions). Run this program immediately. We choose the windows version as the guide, Mac version as the same in the steps.Step 1: Import video.Import the video files to this program by click "File" menu and select "Add Video/Audio" or "Add from folder". Or you can directly drag and drop the files to the program interface. Step 2: Output Oculus Rift compatible 3d format.Tap on "Format" bar and find "3D Video", there are a lot of format options for you. You can choose the output 3D format according to your phone, here "MP4 Side-by-Side 3D Video (*.mp4)" is recommended.
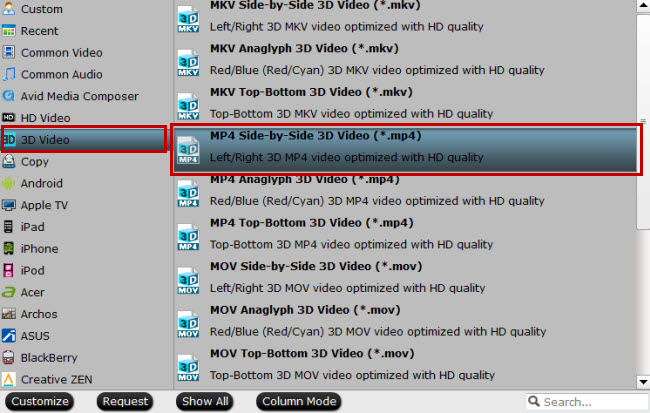 Step 3: Convert Files to Oculus Rift SBS 3D MP4.Hit right-bottom "Convert" button to start the conversion process.When the conversion finished, transfer the generated files to your phone to watch on Oculus Rift with the Oculus Live app.Read More: